How to use Site Audit
Site Audit is the core tool of Sitechecker. It helps you to run an advanced technical SEO analysis of any site:
- Scan websites for technical problems.
- Identify on-page and off-page SEO issues.
- Check for broken files and internal or external links.
- Find weak or duplicate content.
- Assess page errors, page load speed issues, and pages blocked by robots.txt.
- Find out how to fix all the errors named above.
-
Share reports with contractors or clients
How Site Audit Works
Sitechecker crawls your entire website and checks for over 100 potential issues such as broken links, redirects, HTTP status codes, 404 pages, 5xx server errors, meta titles, h1, canonical tags, robot tags, content length, external, internal links, and anchors for each URL. You see the detailed report with all the issues and how-to guides that help you to fix them and improve your SEO performance.
When using Site Audit, you will work with three main screens:
- Summary
- Issues
- Page details
1. Summary
It’s a starting screen on which you can see high-level stats about your website’s issues and errors, quick info about the number of crawled and indexed pages along with your website score and the information about your hosting.

All the issues are divided into 4 main sections:
The Criticals and Warnings have an impact on your Website Score.
- Criticals (The issues that have a direct and crucial influence on your SEO)
- Warnings (Issues with a certain influence on your SEO, however, they have less value than Criticals )
The Notices and Opportunities do not influence your Website score in the Sitechecker app.
- Notices (These issues are rather recommendations. They can help you to improve user experience, optimize your website, and format it accordingly to the general rules )
- Opportunities (These checks are meant to even better improve the website and smooth the look of your pages and UX )
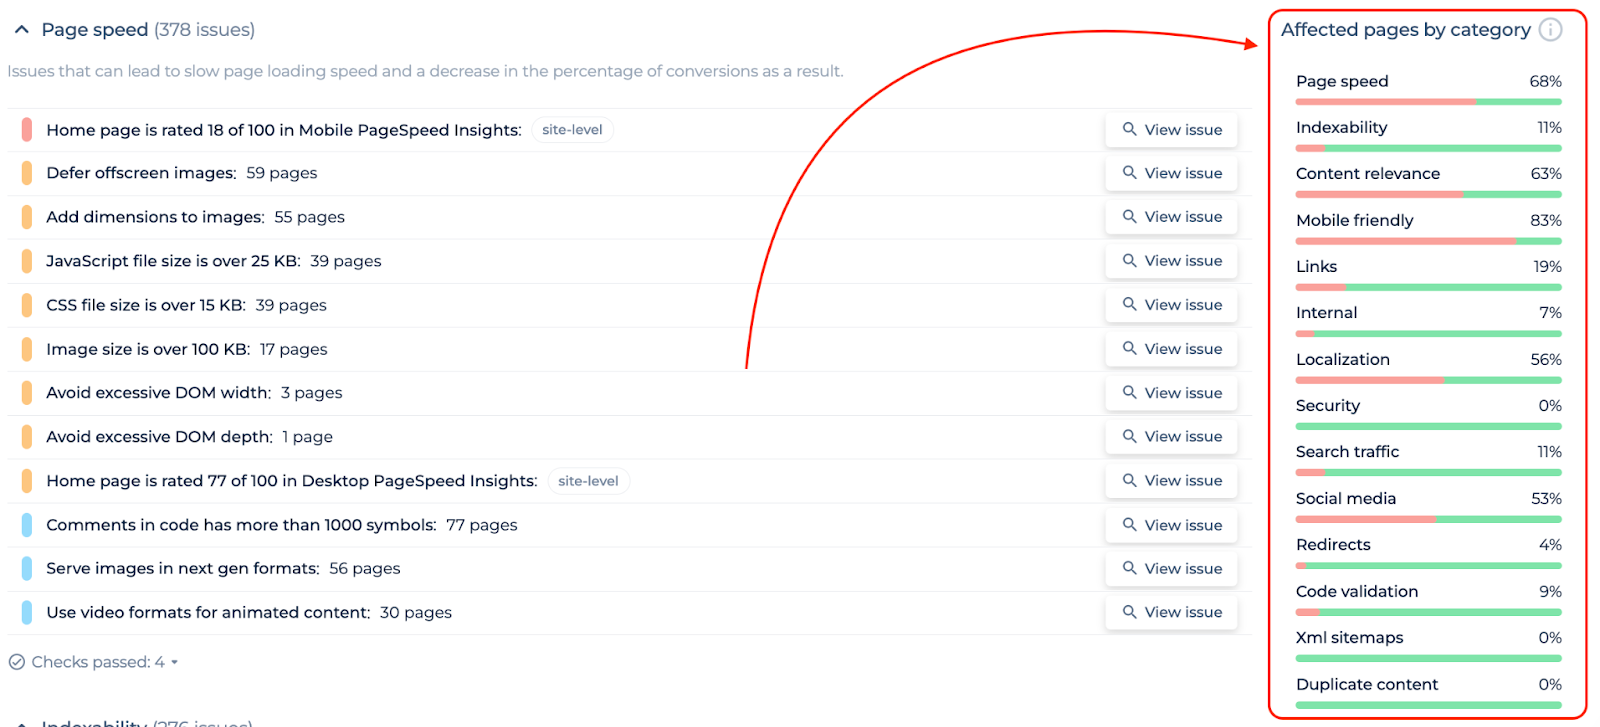
Apart from that, we also have categories below, that will help you to better understand and sort all the issues by their influence on the website.
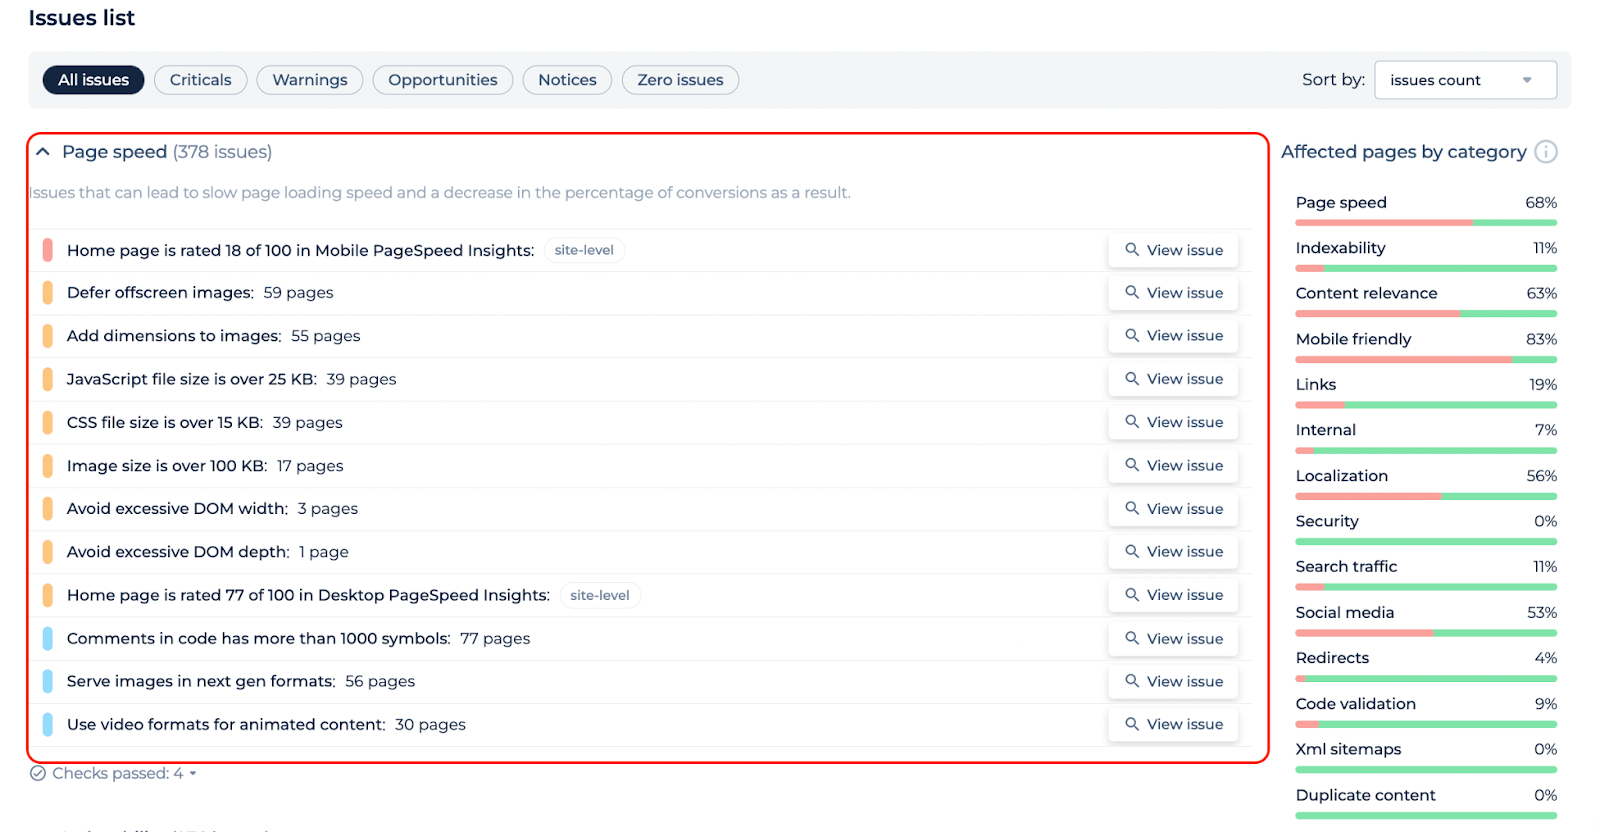
Along with that, there is a quick statistics with the percentage of the affected URLs by each category.
2. Issues
It’s your main screen for working with issues and fixing them.
After you decide what issue you would like to fix at first, click on the “View issue” button and you will see all the pages affected by a specific issue or a filter (as an example, we will take the “H1 has other tags inside” filter.). As soon as we are on the page with all the issues of the particular category, you can click on the “View issue in code” button and you will see where exactly this issue is located in the source code of the URL.
The “View issue in code” button may change its name depending on the type of the issue. For example, if the issue is about having duplicates, it will have the name “See duplicates” and show you where these duplicates are located.
3. Page Details

On a page details screen, you see an in-depth analysis of specific pages on your website based on parameters such as:
All the technical SEO issues we have found on this page, general information about URL, its content, images, display in Google SERP, image alt attributes, all external and internal links, Google score for usability and speed on desktop, and mobile versions, and more.
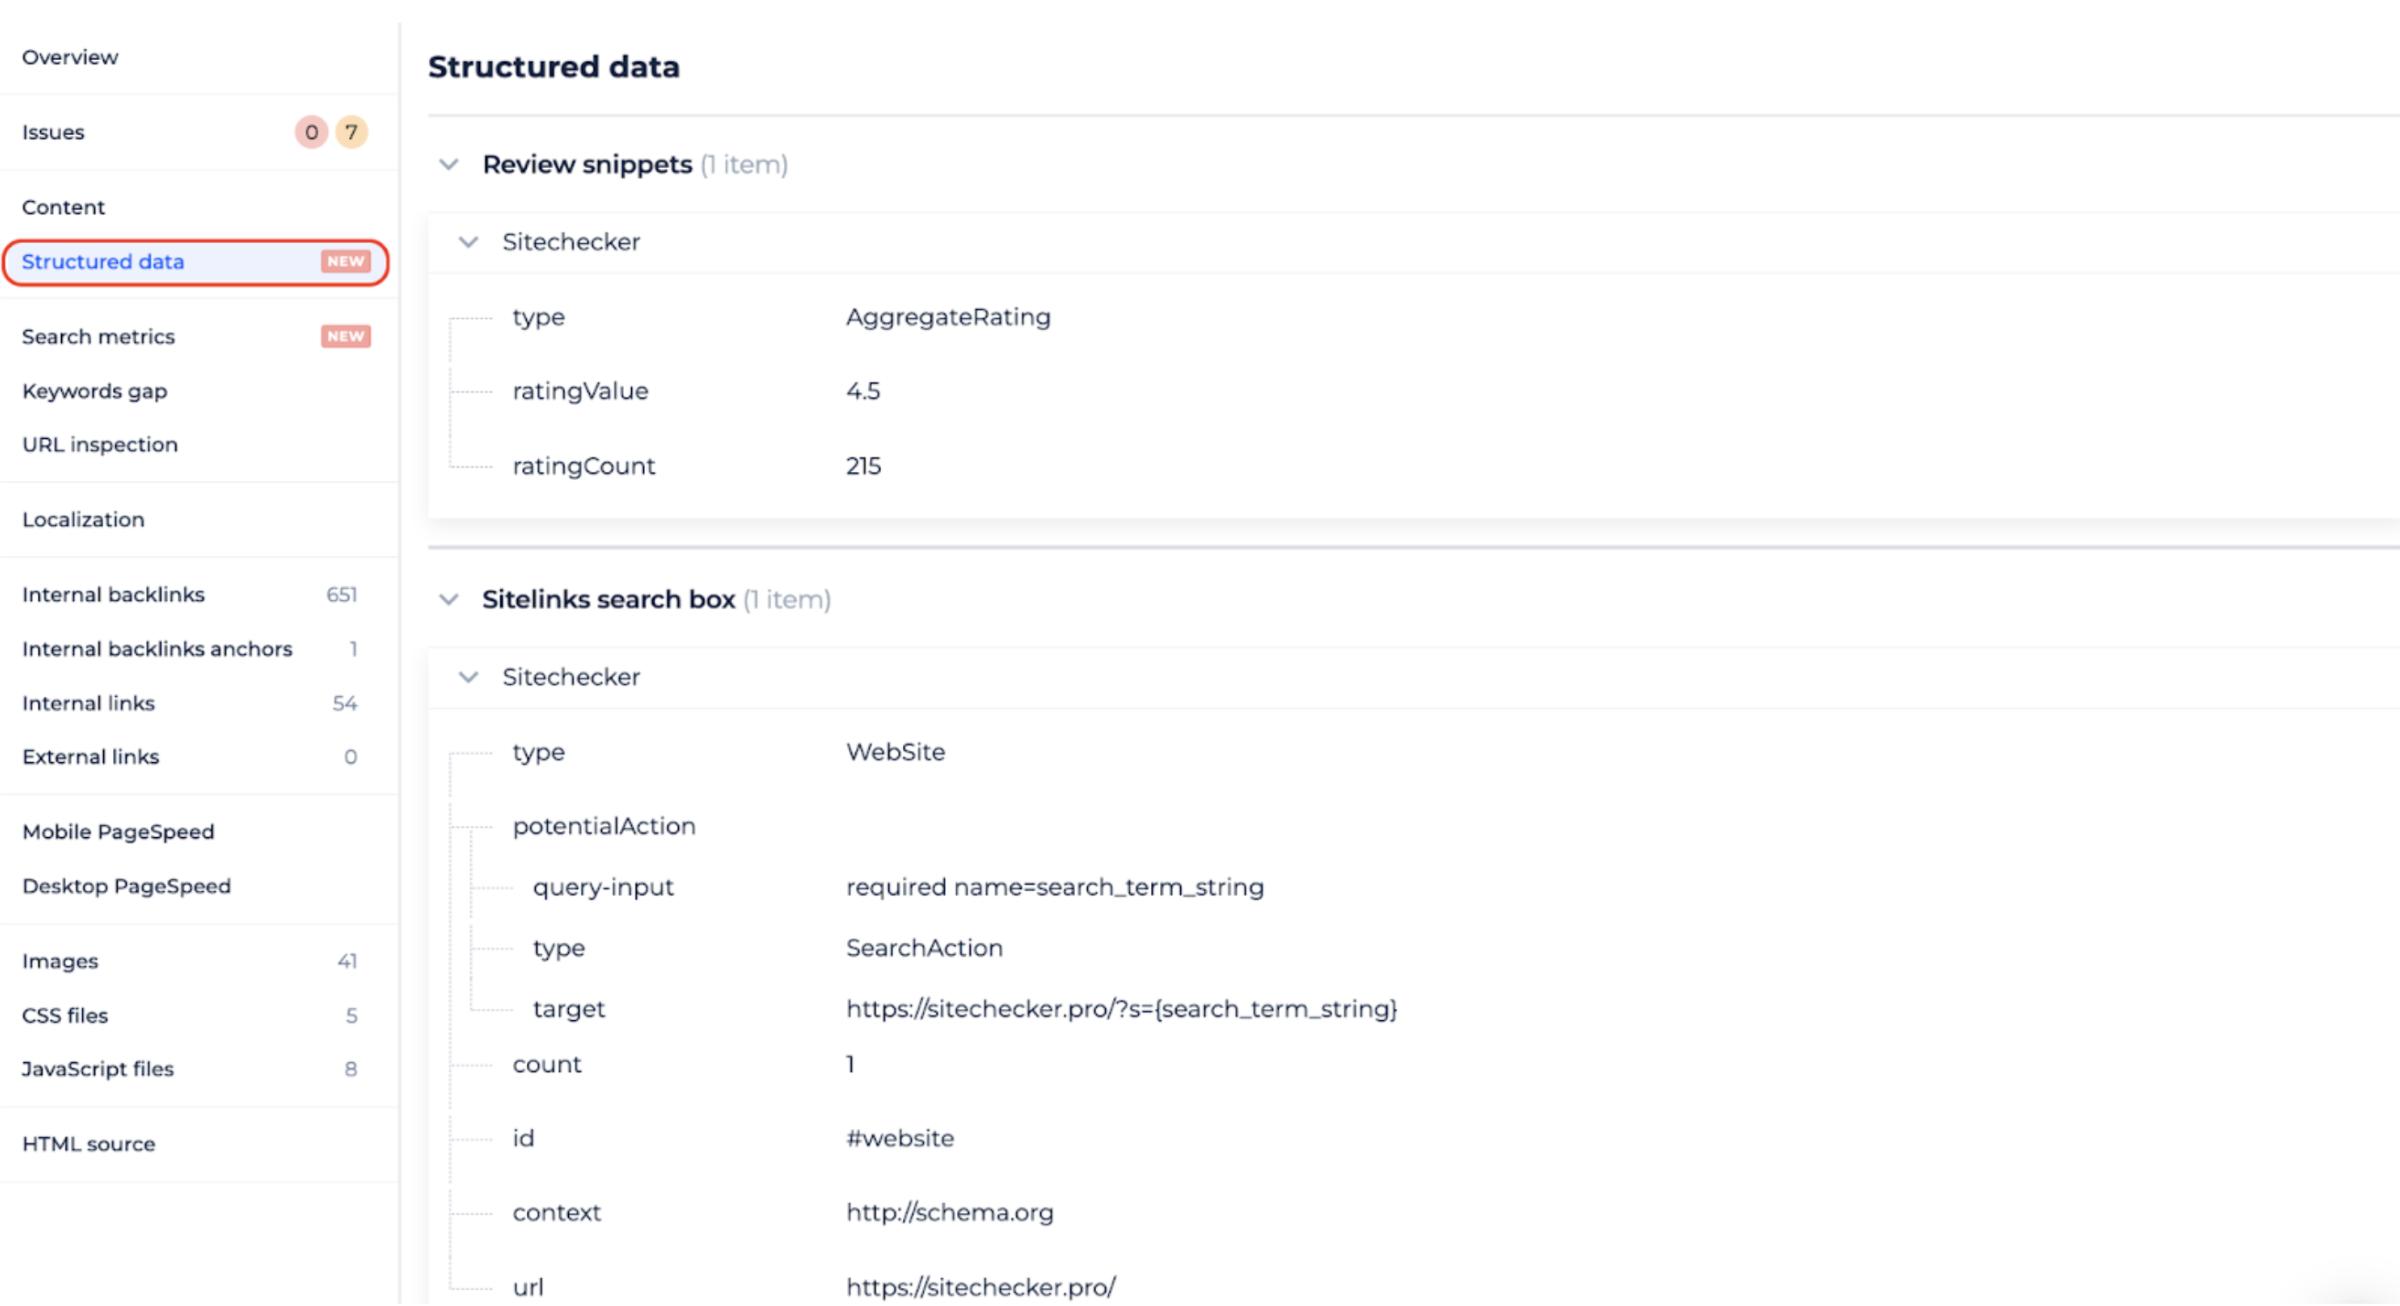
Structure data tab will check if the structured data is present on a specific URL and what content it has.
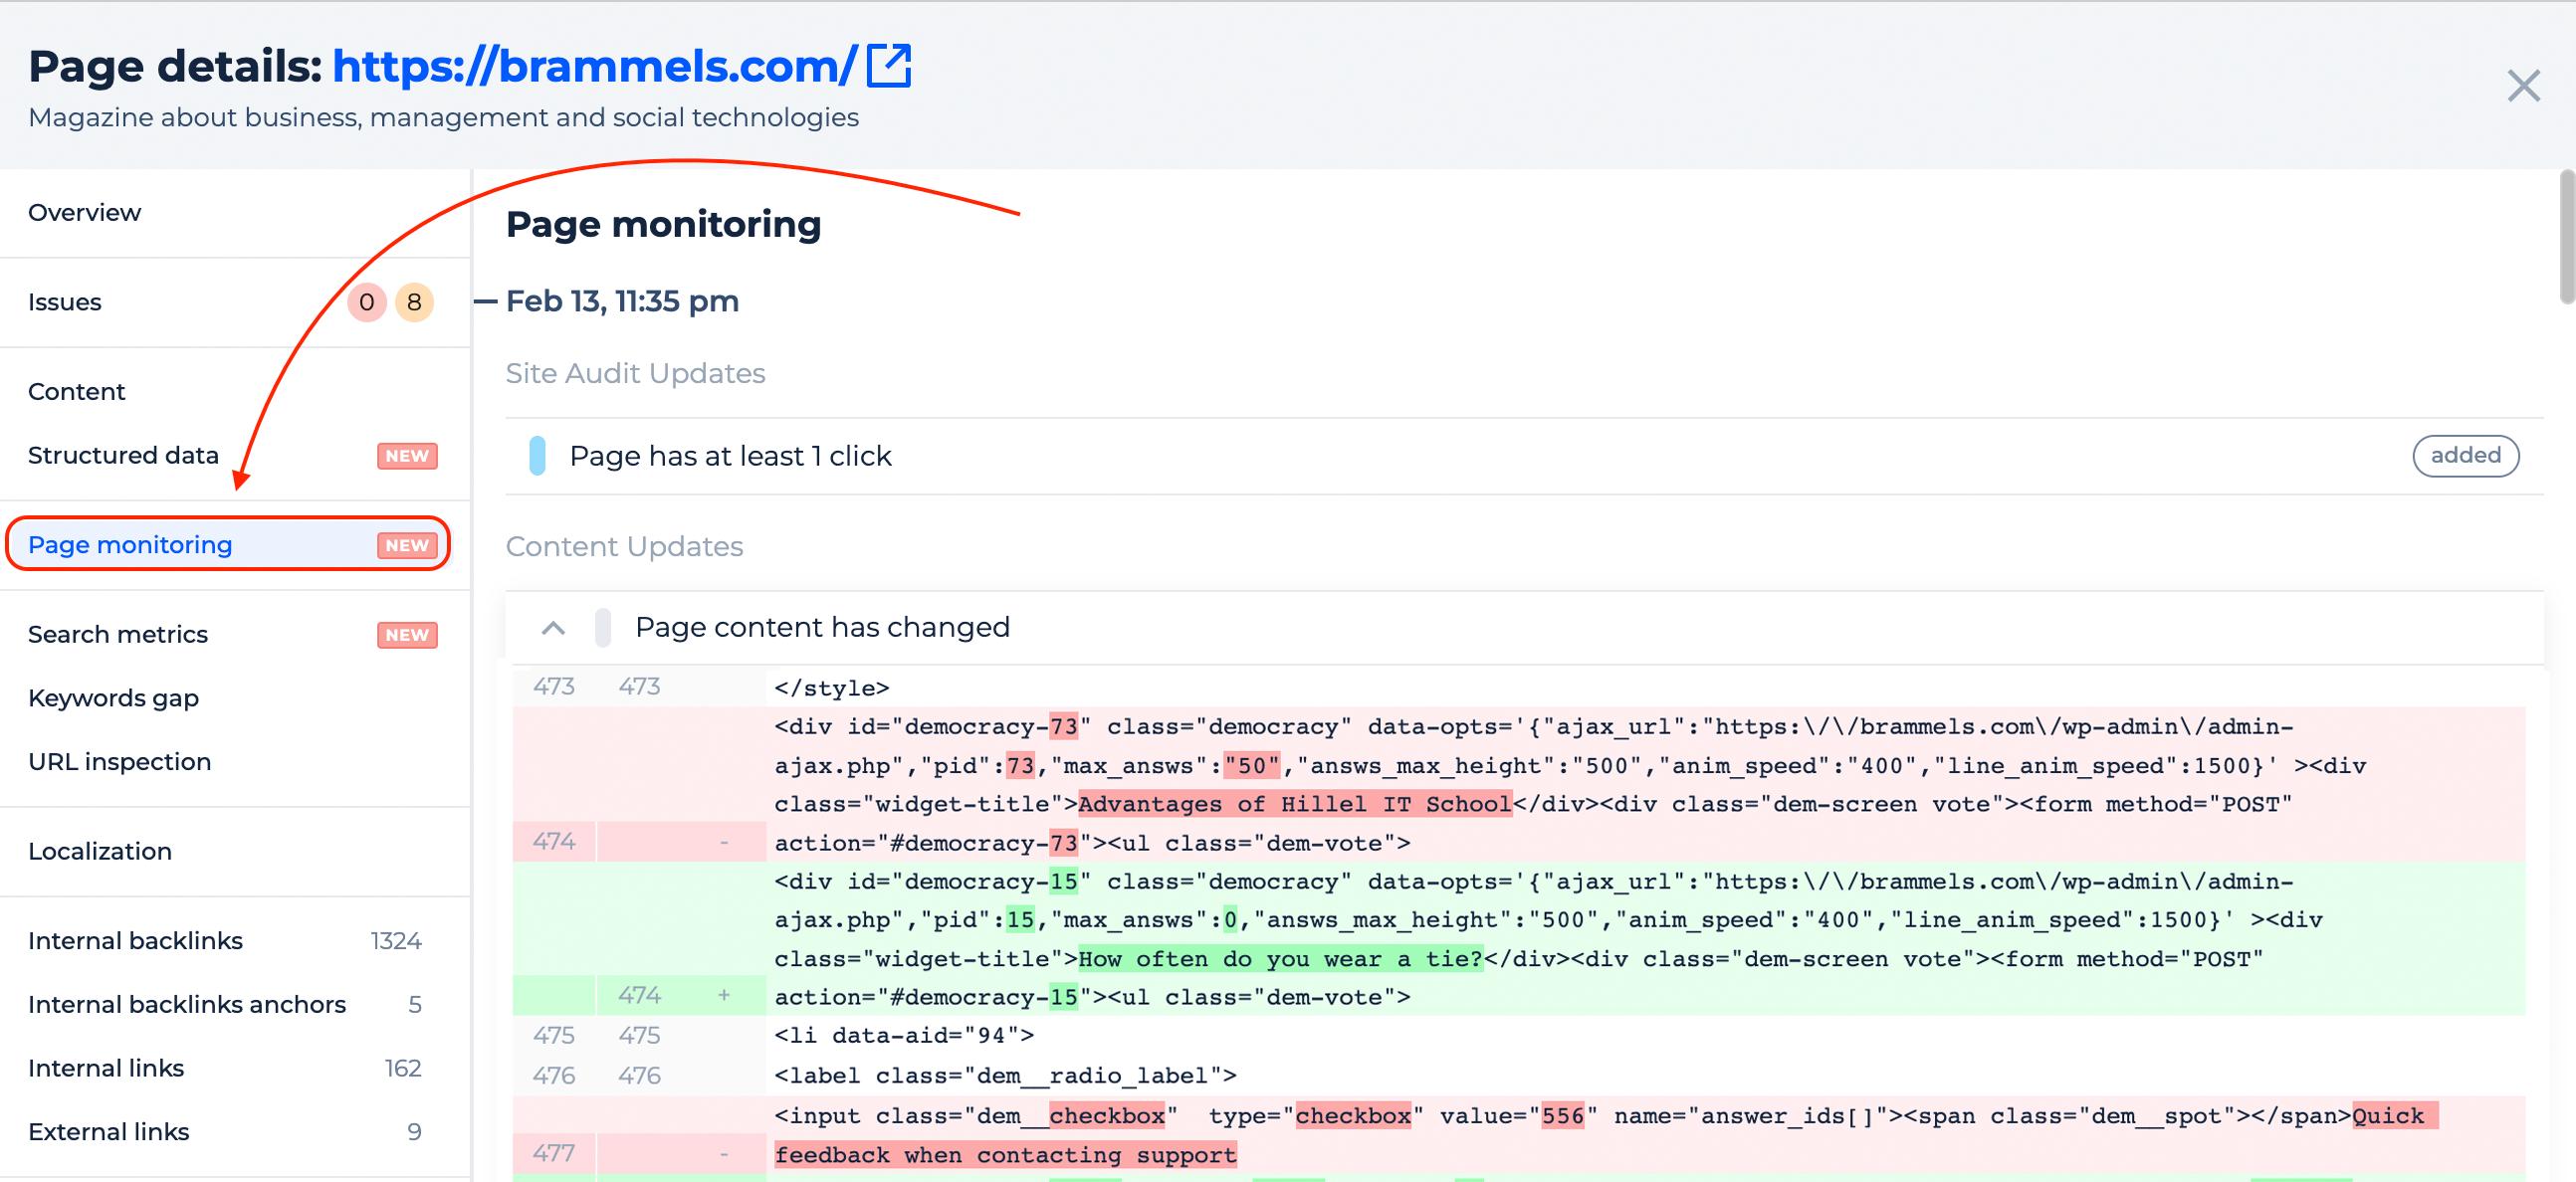
Page Monitoring tab will allow you to track all the issues that appeared or were fixed on the specific page. For events of the Content Updates type, there will be the possibility to open the event and see the changes in the content of the page.
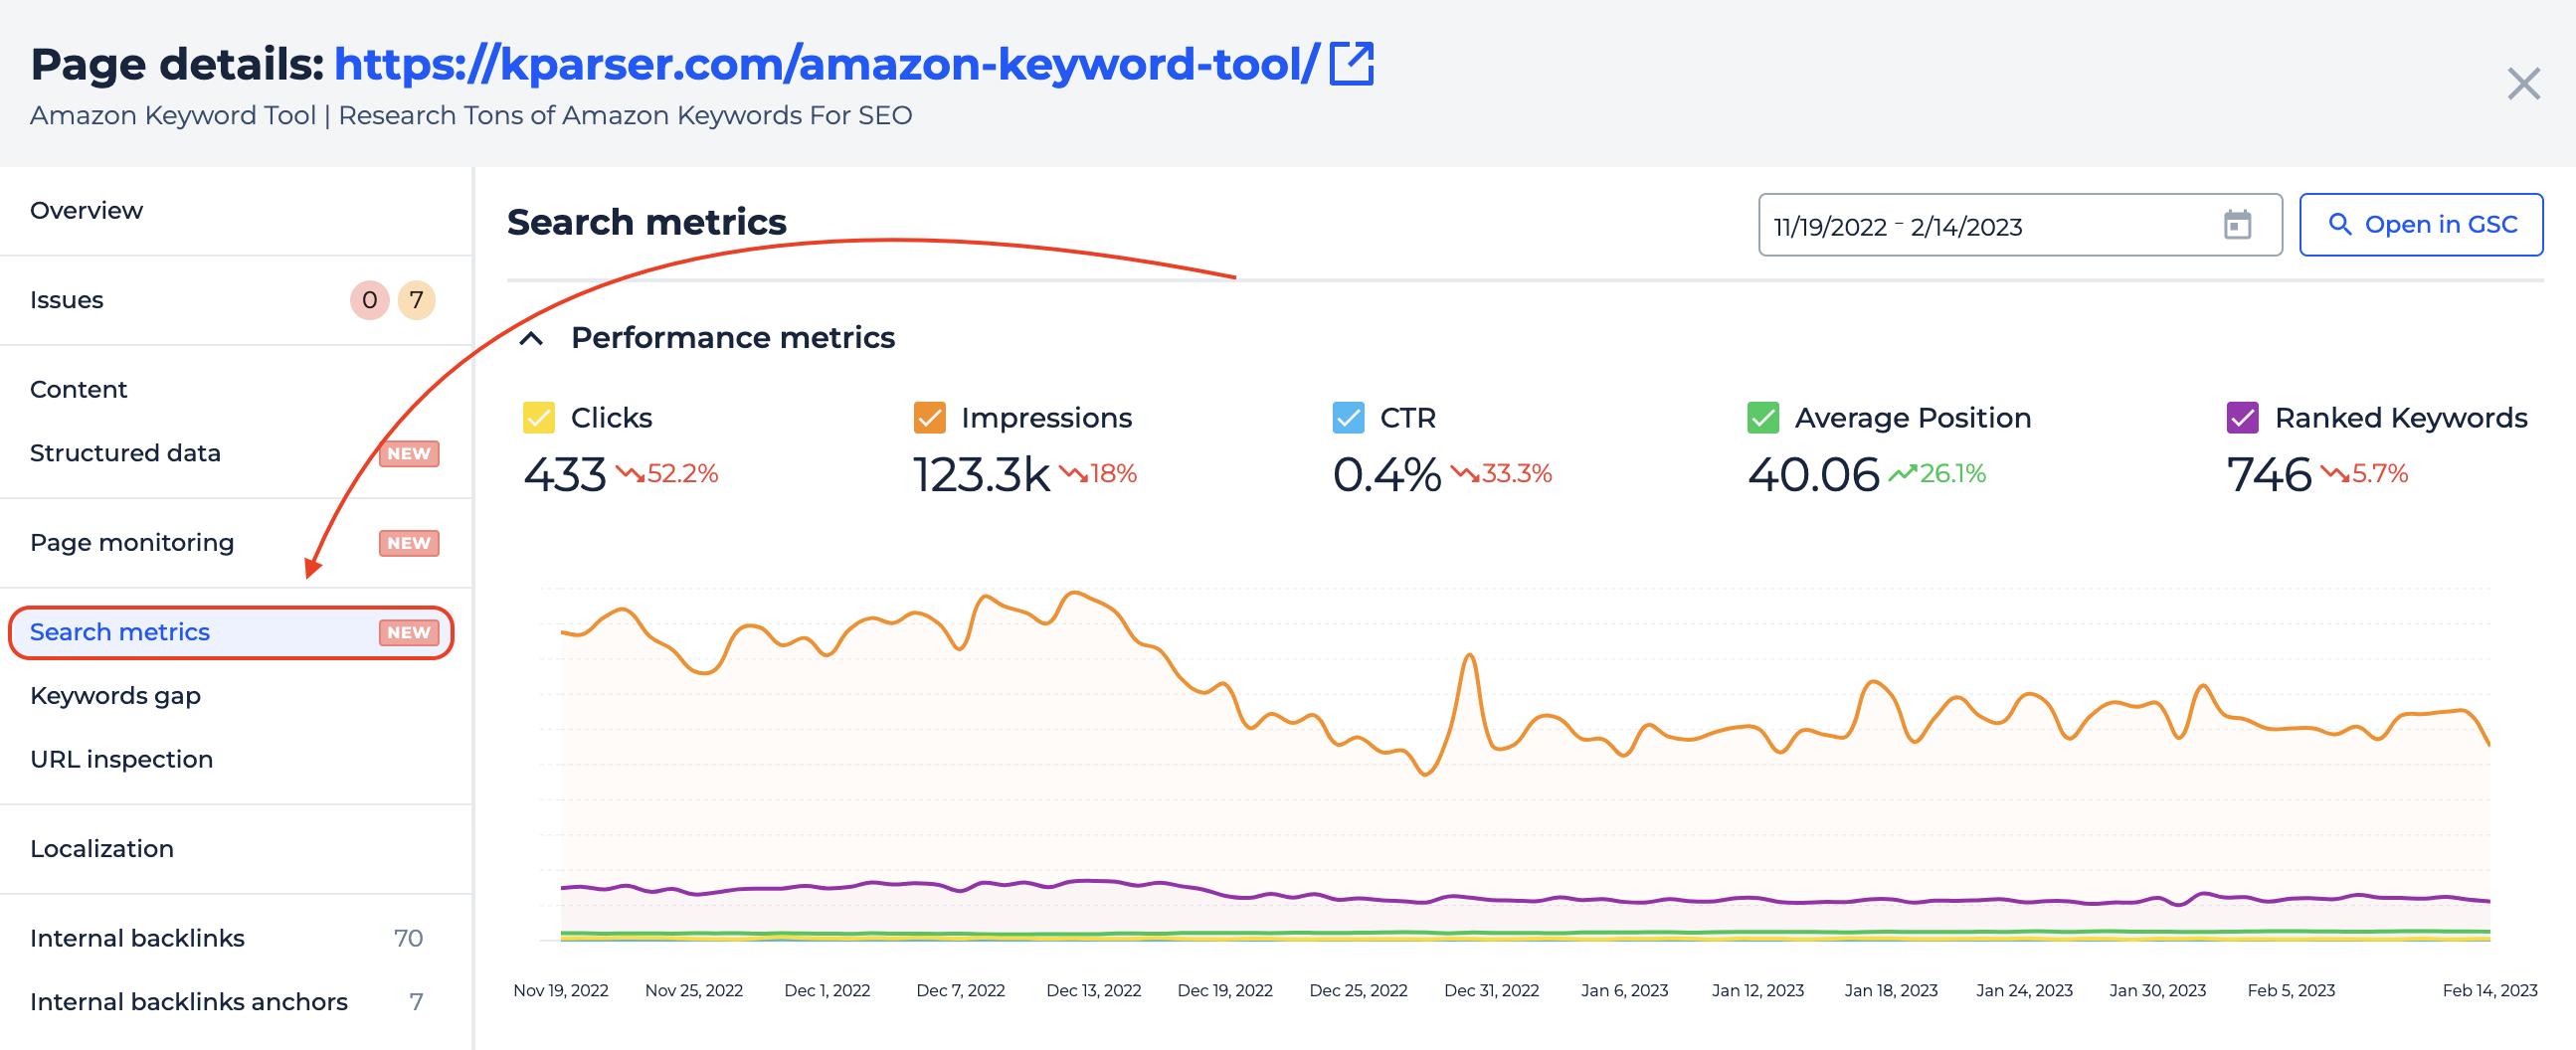
Search Metrics tab is an incredible source of information integrated from the Google Search Console right into Sitechecker. It will give you a chance to see all the main metrics for the specific page right in the Page Details report.
Here we analyze the performance of the page (Clicks, Impressions, CTR, Average Position, and all the Ranked Keywords).
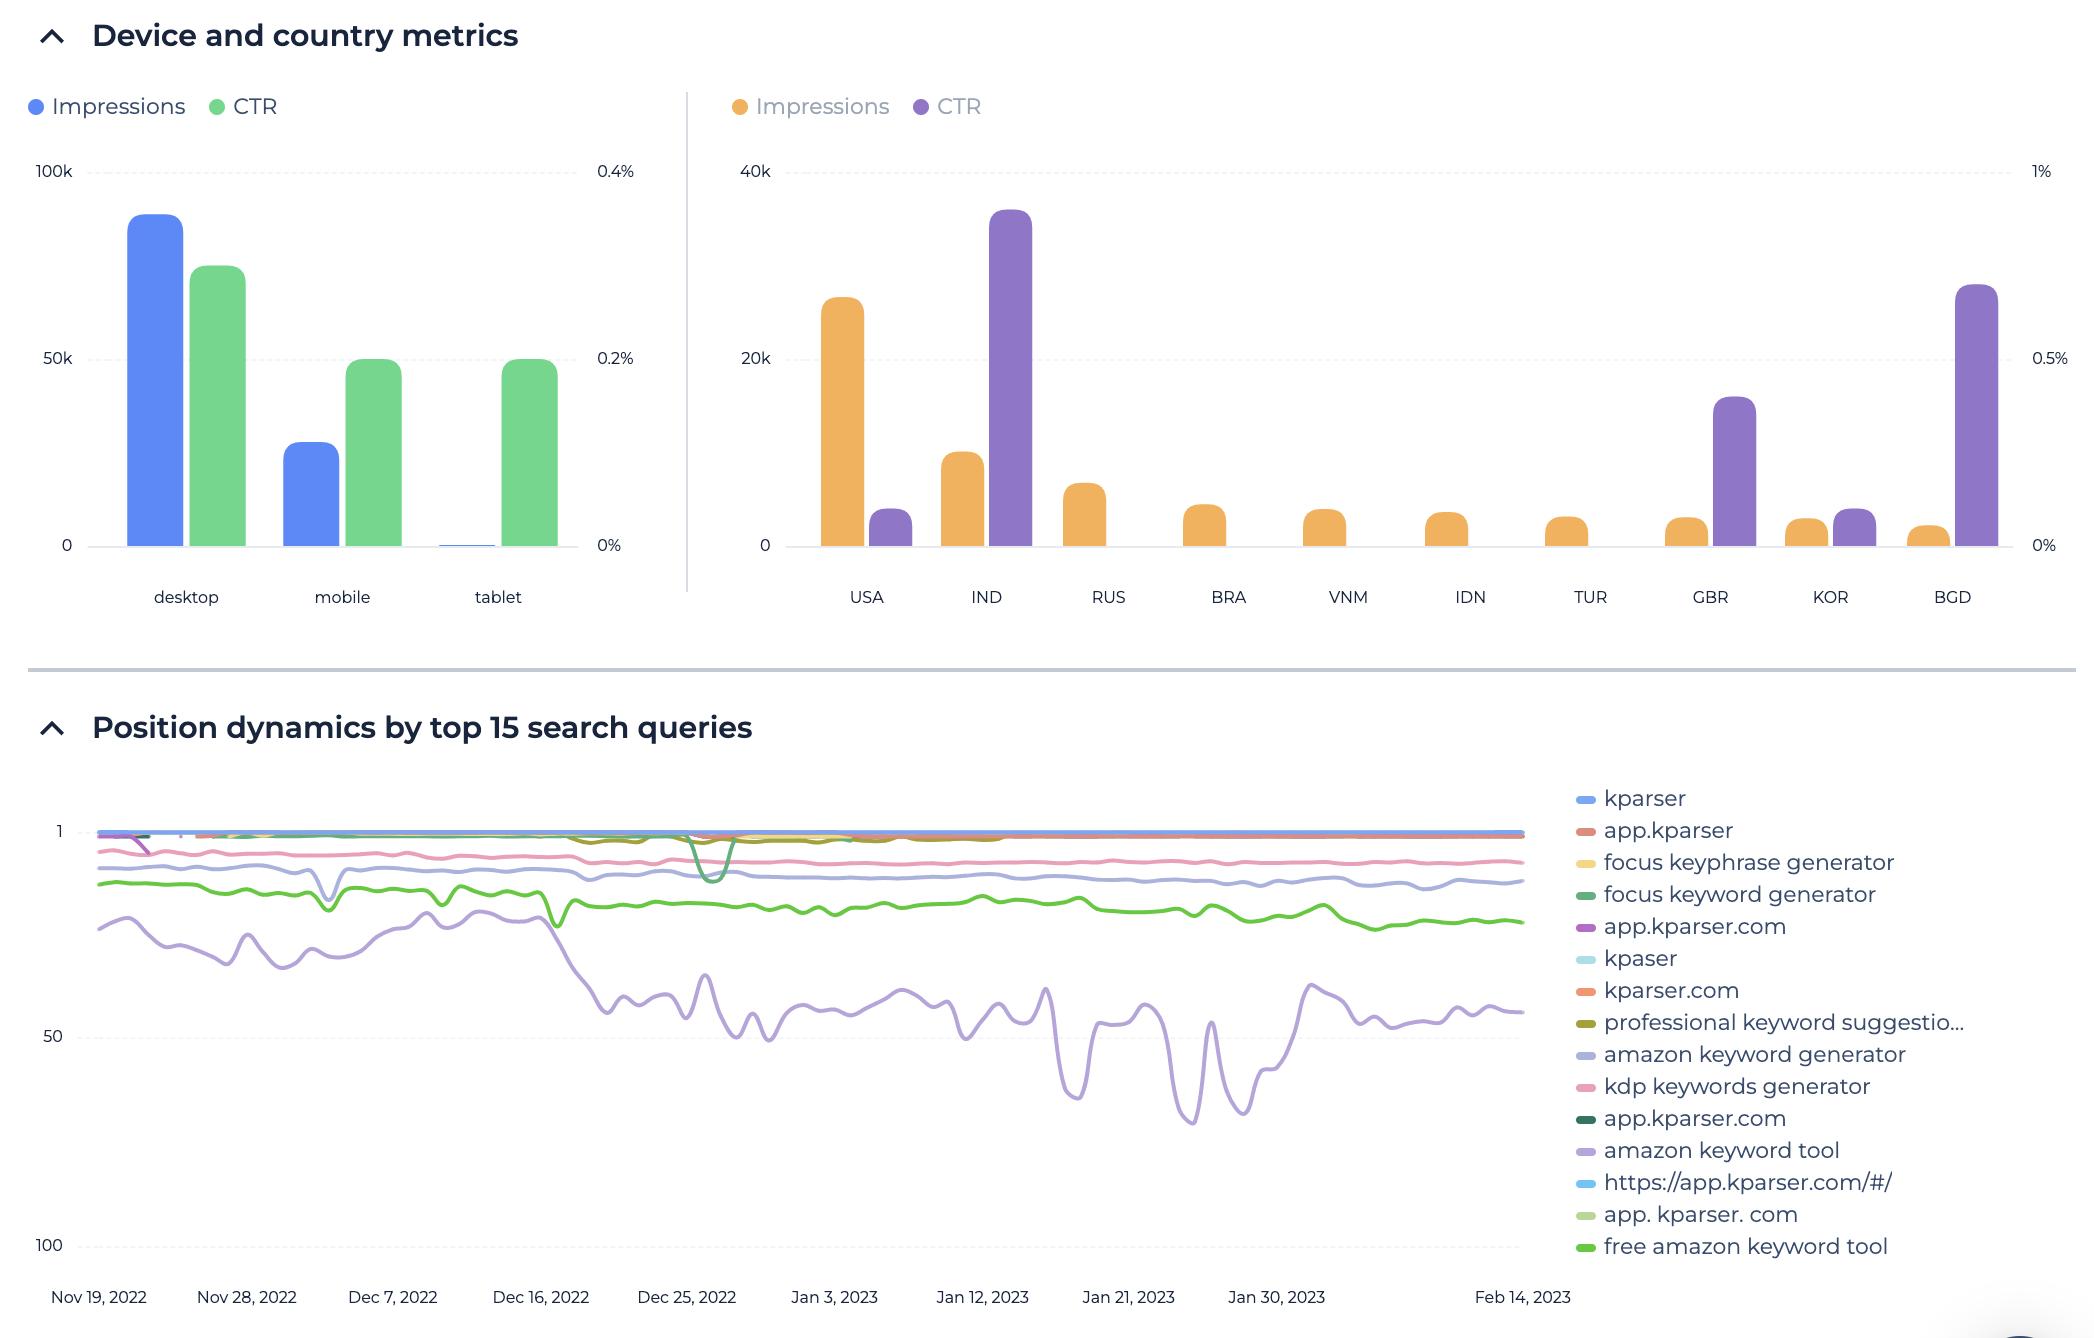
By scrolling down you will see the insights about your audience sorted by the type of device and visitors countries and positions for 15 keywords with the highest Potential Rank over a selected period.
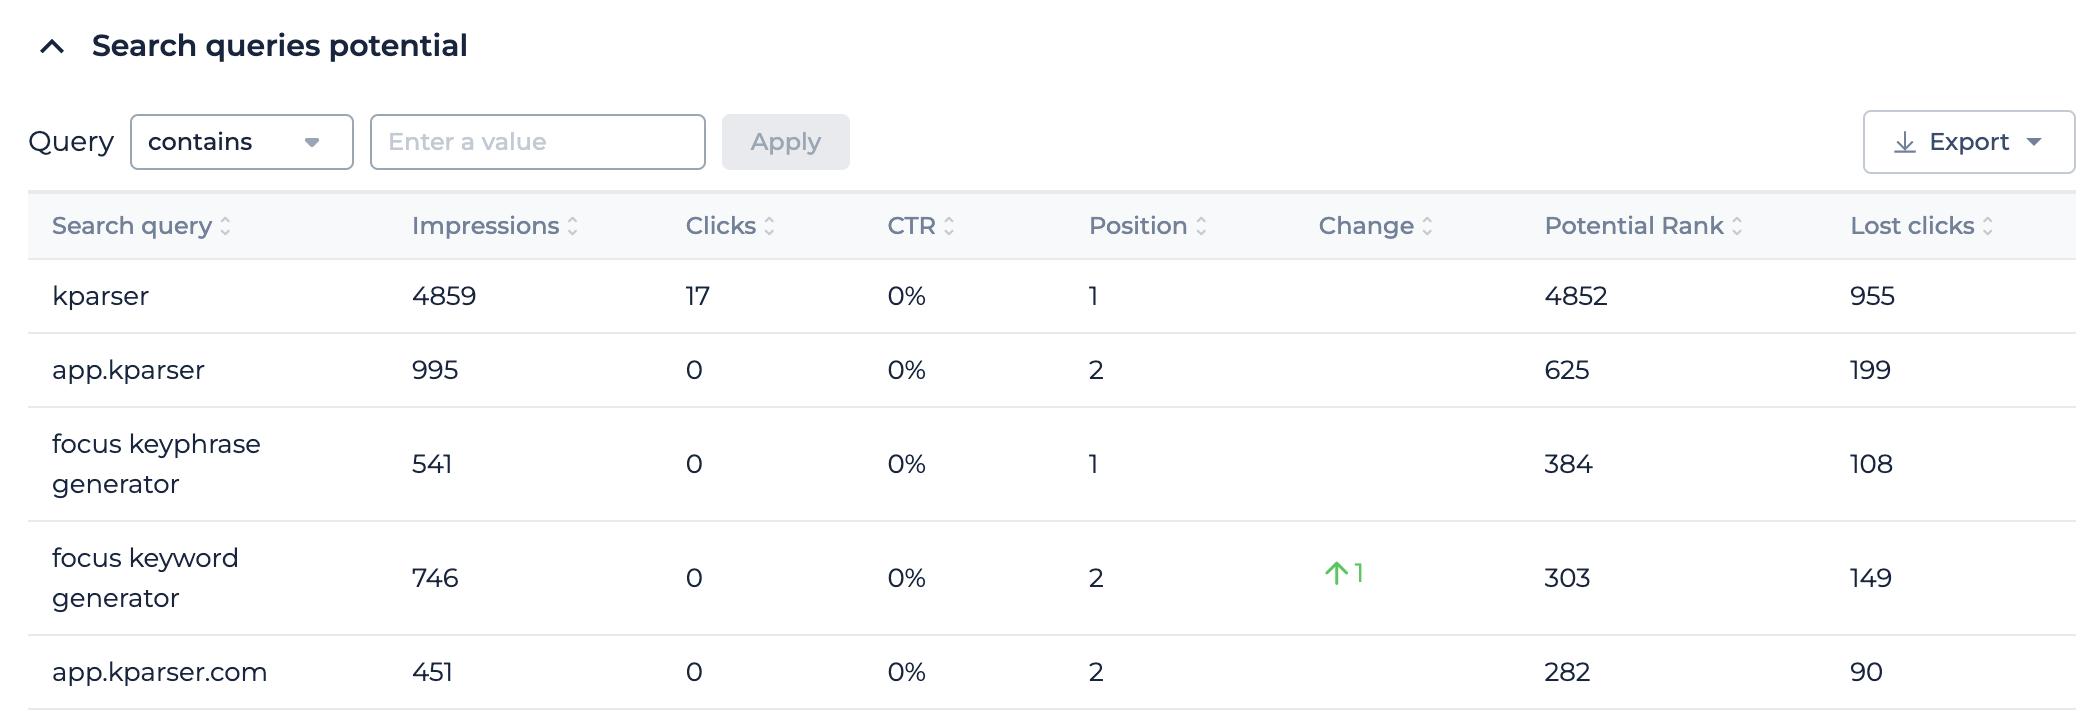
The last section of the Search Metrics tab will present you with all the keywords this particular page was ranking for in the period you choose in the calendar. There you will also see the main metrics for the collected keywords and will be able to export this data.
There are 3 types of links you can audit for a specific page:
Internal backlinks - all links on your own website that refer to a chosen page of your website (also called anchors).
Internal links - all links on the chosen page to other pages on your own website.
External links - all links on the chosen page to other pages on different websites.
To access this section, you will need to go over “ View all affected pages” at the top of the Site Audit Tool and find the page you want to get the details for. Or use this tool to check each link separately. After the click on the URL, you will be presented with the report for the page.
How-to use Site Audit
1. Configuration for the crawler bot
All of the information we provide in the report is based on the scanned pages by our user agent (Sitecheckers bot). Thus, in order to get the best results, you will need to set up the bot in accordance with your personal needs.
You can access the settings of Site Audit when you create a new project, or you can edit the setting for the existing one. The settings can be accessed from the top of the page of Site Audit Summary or from the project list.

2. Setting up Robots.txt rules for the user-agent.
By default, Sitecheckerbot will crawl your website respecting rules in the robots.txt file. But you can edit these rules and this will not change the settings of your actual robots.txt file, as it is just local rules for our bot. However, in order to start editing the rules, first, you will need to verify the ownership of the website. You can only edit robots.txt settings if the ownership is verified.
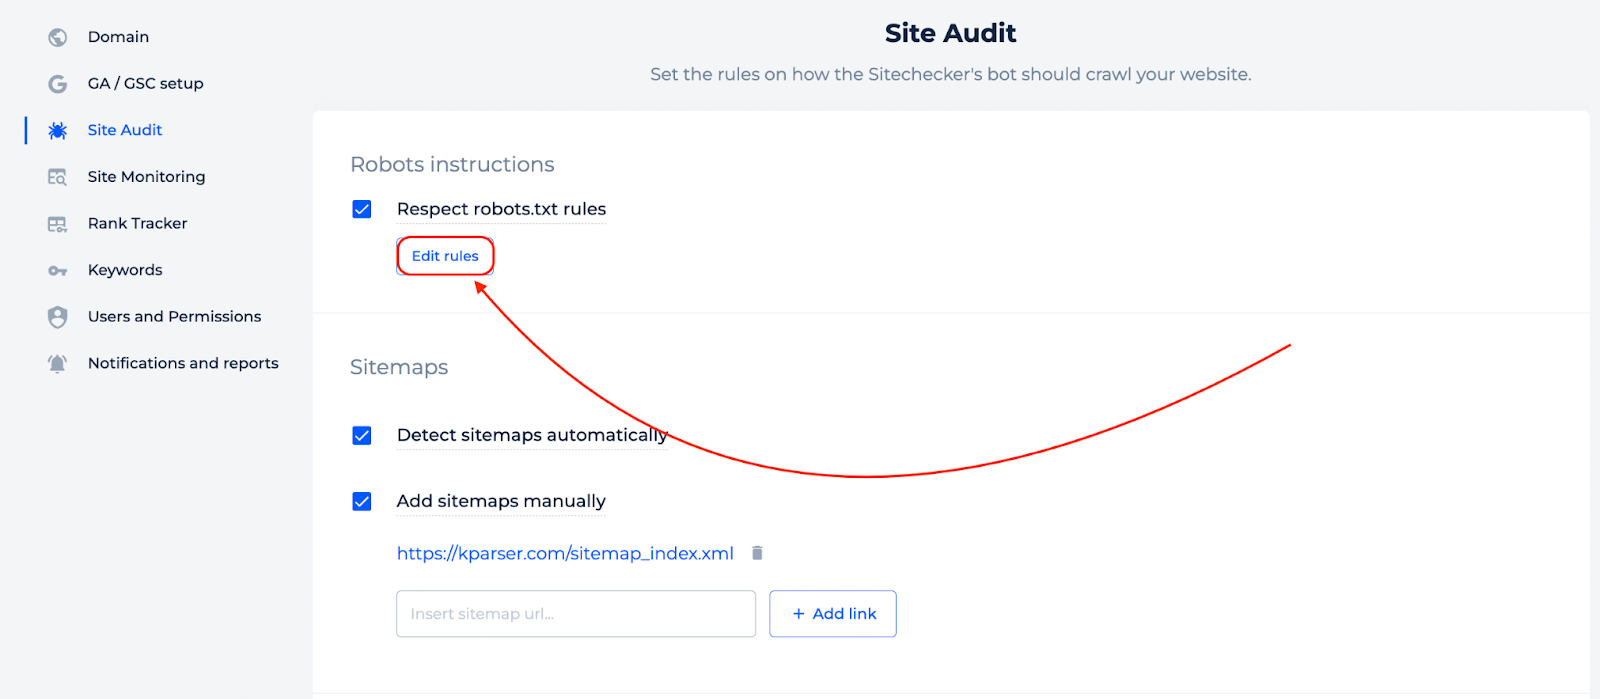
Here is a quick articleon how to properly set up Robots.txt rules.
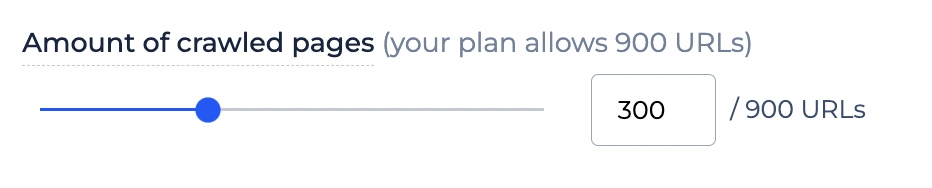
3. Limits and Filters
There is an option to set the limits for the number of URLs our bot will crawl on your website. The maximum number is 30.000 though.
Also, you can set the number of parallel requests. It is the number of URLs the Sitechecker's crawler can request simultaneously. Set it to a minimum if the website responds slowly or the crawling process leads to 5xx server errors.

Below you can also find some really useful filters that can customize the crawling to match your personal needs:

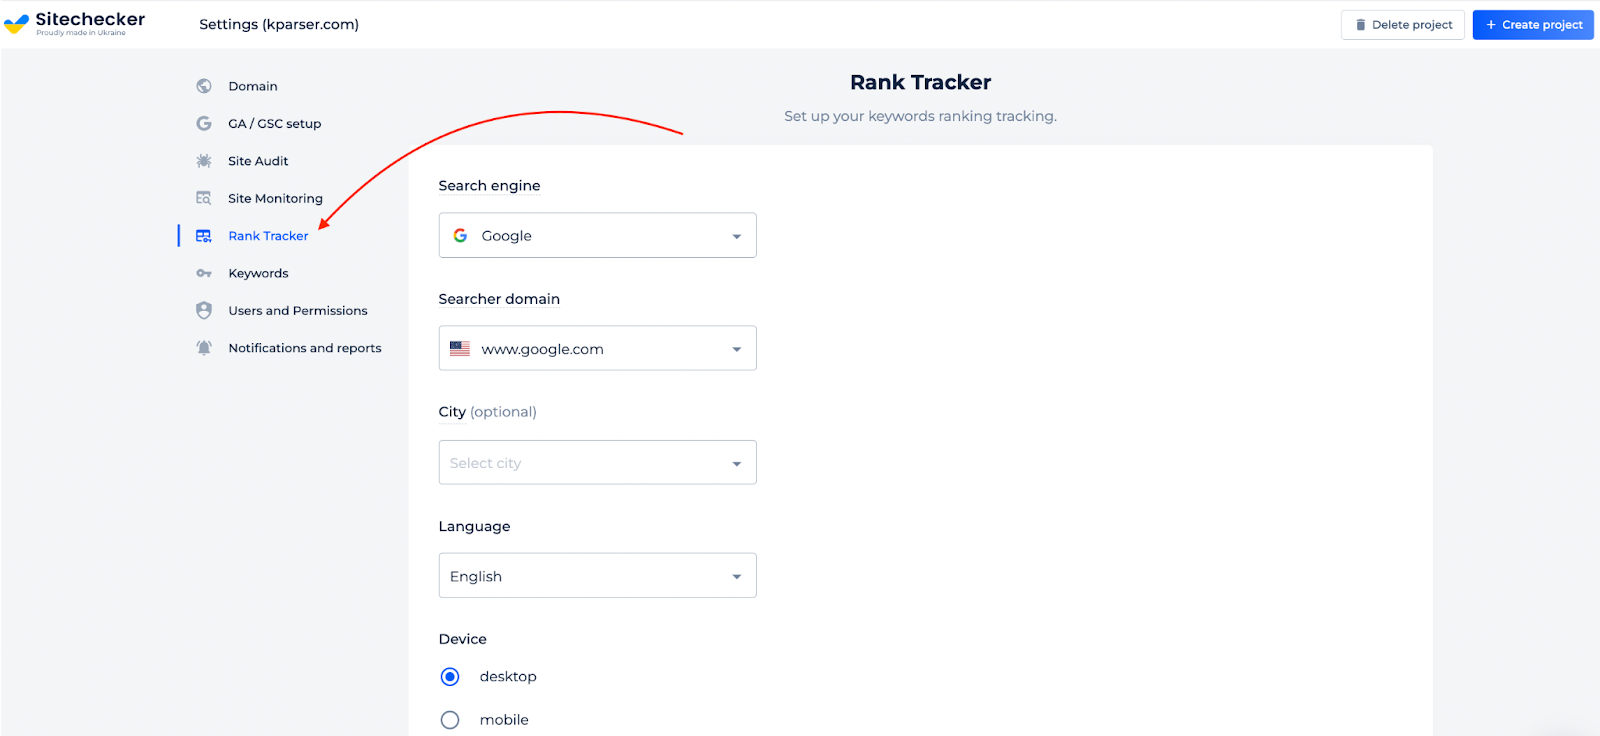
4. Go to Site Audit Summary
After the second step, you can save settings and go to Site Audit Summary. You also can finish creating project. Set up the rules for Rank Tracker on the sixth step and add the keywords accordingly.
When the crawling process is finished (usually it takes up to 2 minutes for websites up to 1000 pages) you can access a report and evaluate how many issues your website has and how critical these issues are.
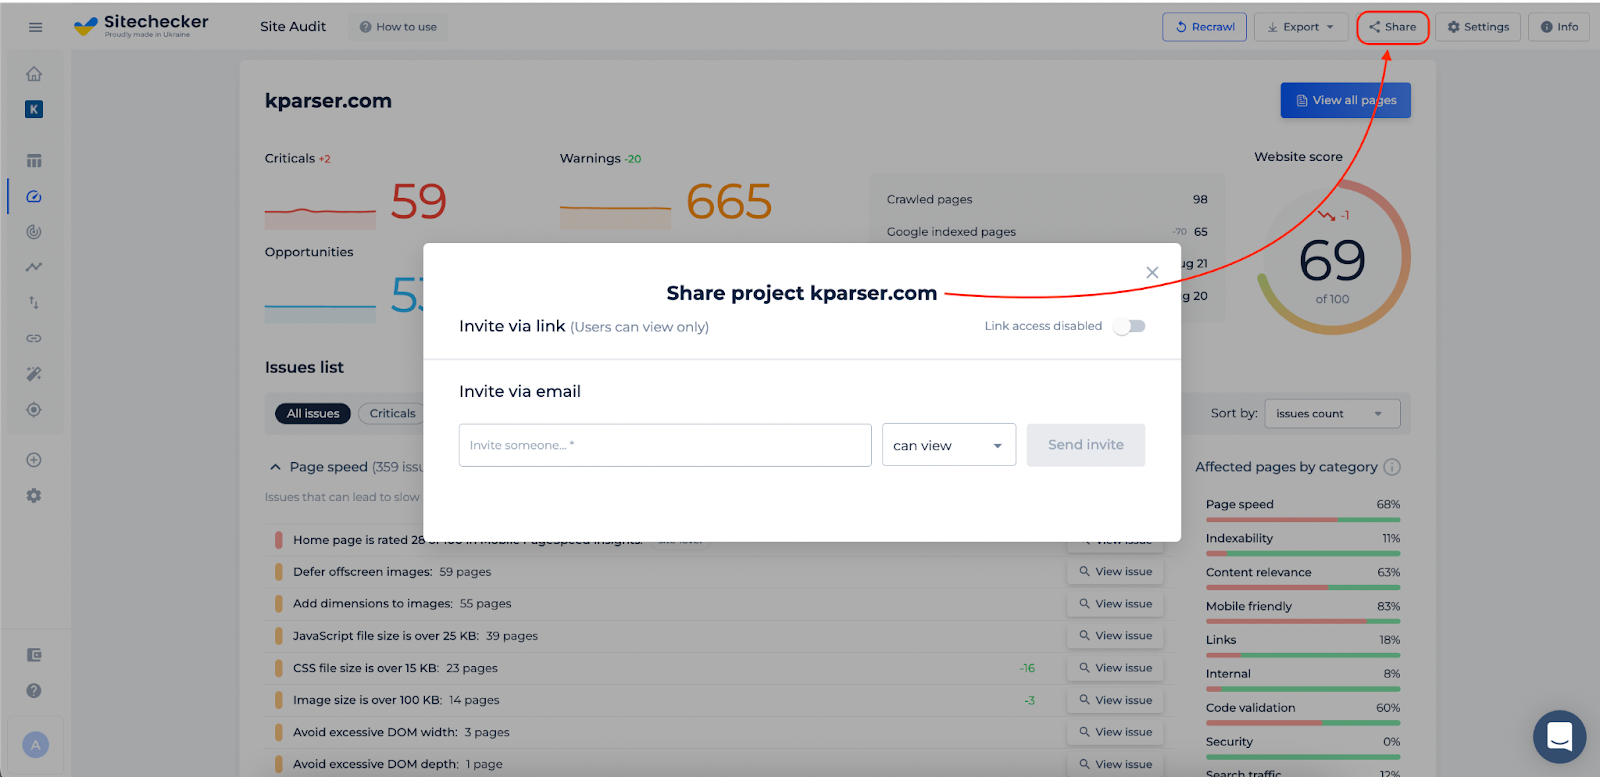
5. Send a report to your subordinates or freelancers (for website owners who don't work on-site on their own)
If you are a website owner and have developers or SEO specialists who are working on your site you can give them access to view or edit projects. You can do this by clicking on the "Share project" button on the top right and inviting another person via email. Then you can choose what type of rights you would like to give to this person. Please mind that another user should be registered with us and have any plan (it also can be a free plan).
6. Send a report to your clients (for agencies owners and freelancers)

If you are an SEO specialist, web developer, designer, or marketing manager and working on clients' websites you can download a Site Audit report in PDF, CSV, or Google Sheets formats and send it to your client. Below is an example how what a PDF report looks like:
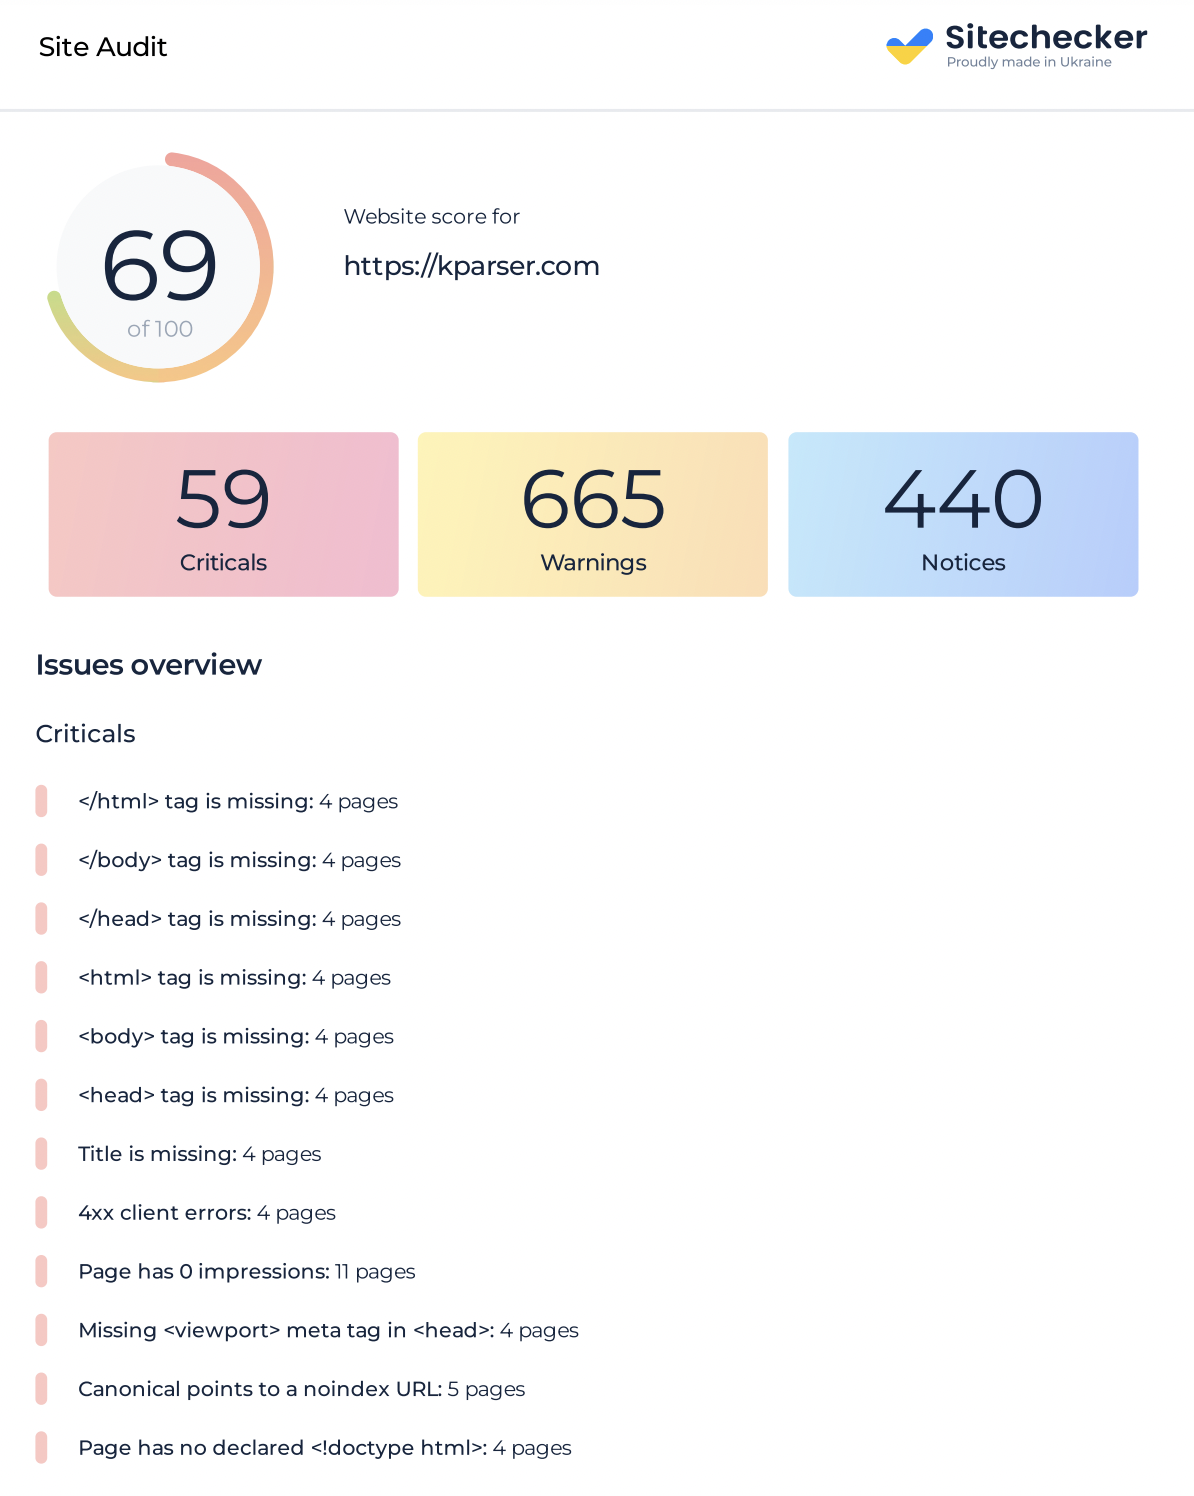
This report can help generate leads for your services or demonstrate to your clients how many issues you have fixed on their websites (in a case when you send a report before and after work).
You also can brand your reports. Use this path to add your own logo: ProfileLogo -> Settings -> Change PDF branding.

7. Start fixing errors yourself (for website owners who work on-site on their own)
On-Site Audit Summary you can see a list of all issues your website has. They are sorted from critical errors to warnings, then to opportunities and notices. Click on the issue you want to start fixing at first.

8. Use the sidebar to switch to another issue.
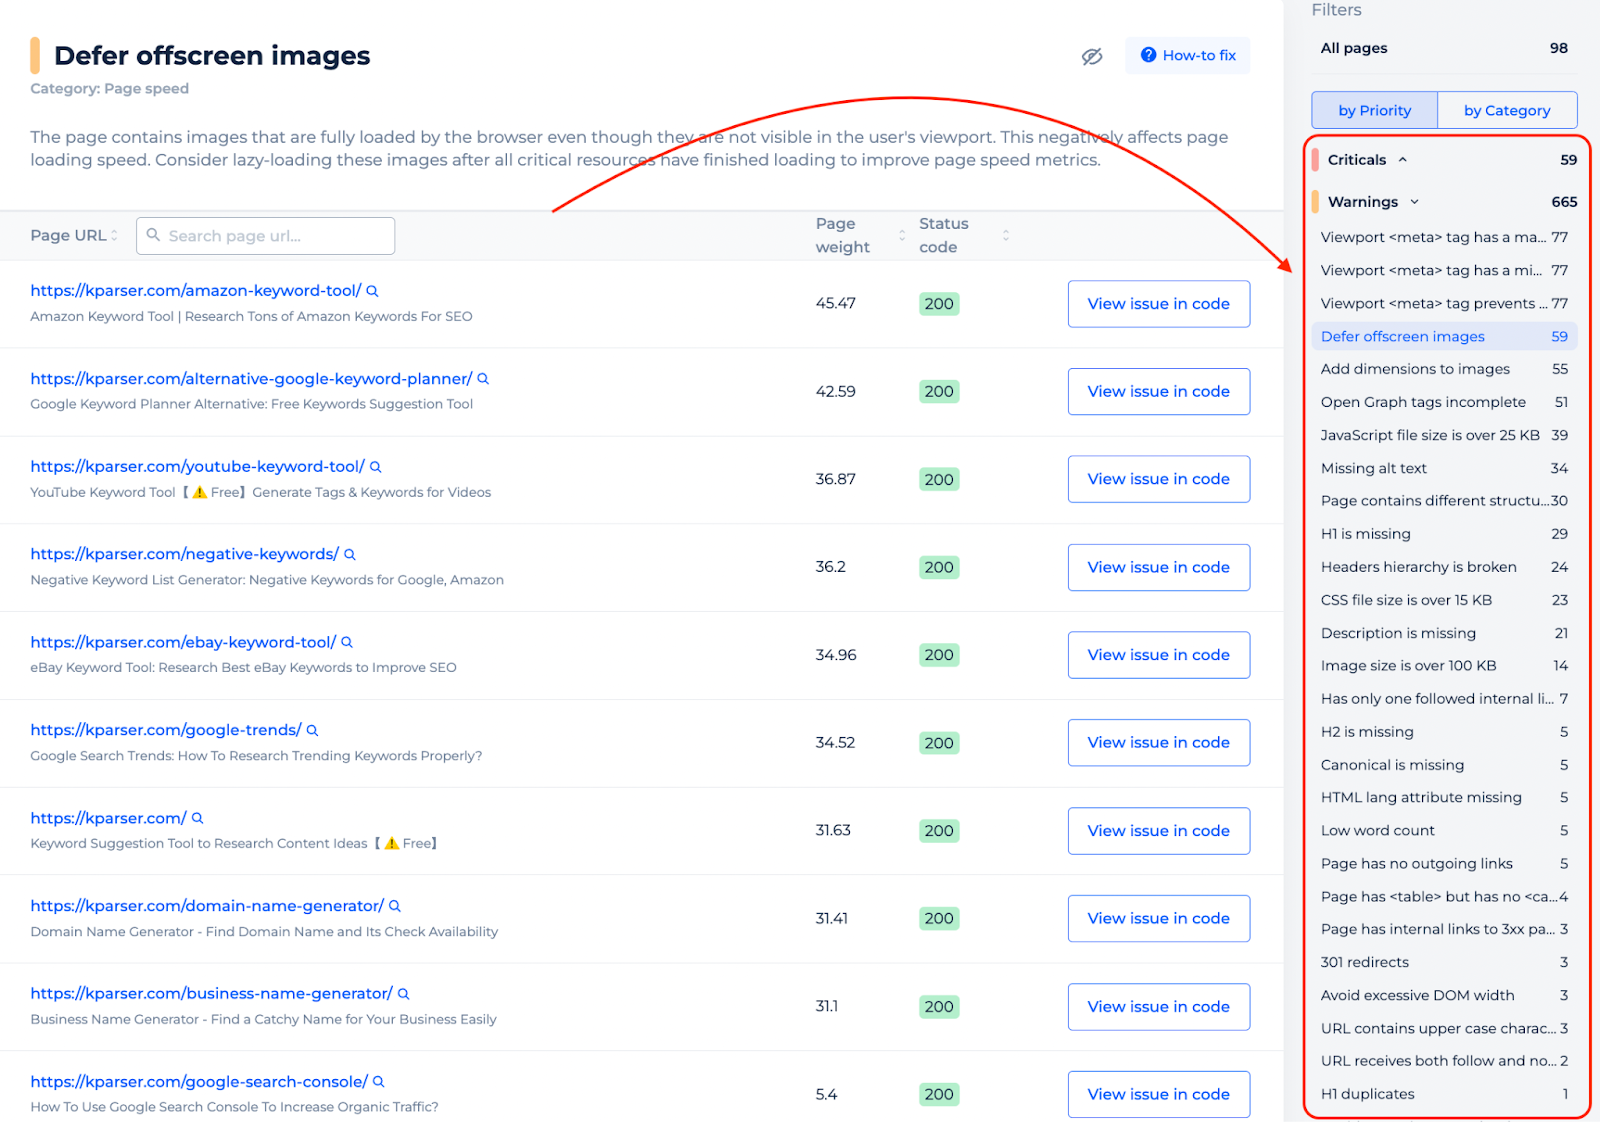
All issues in the sidebar are structured by Priority (Critical, Warnings etc.) and by Category (Links, Indexability, etc.).
9. Ignore all the inapplicable issues

We do understand that sometimes the issues we find may not be applicable to your particular website. Thus, in order to get rid of the issues you think are not influence your website's SEO, you can simply click on the “Ignore (crossed eye)” button and it will disappear from the Site Audit. You can return it back at any time in the settings of the project, in the Site Audit section.
10. Use how to fix suggestions
Each error has it's How to fix guide. You can use it to understand why this error is important and how to fix the issue on the page. Some of these tips also have links to guides from our Knowledge Base and Google Help Center. Moreover, for you to better understand the issue, there are also video guides for most of the issues.

11. Use Monitoring History
In case you enable the Site Monitoring tool in your settings, you will also be able to see how your particular issues change over time. It will give you information on when and what pages were added/removed from a certain issues list.

These are the basics of using Site Audit. When you fix errors, click the Re-crawl button. Sitecheckerbot will recrawl your website again and you'll get a refreshed report.
Don't forget to enable Site Monitoring for your website. It helps you to monitor all the changes and prevent your website from many technical problems it may face when you are growing an online business.